Deploying an Application with a Bucket
In this example, we have an application that uploads, lists, and downloads text files stored in a Cloud Storage bucket. platform201 creates the bucket for you and hands its name to your backend - there are no Google Cloud credentials to connect and no key files to manage.
You need four components: two container nodes, a gateway node, and a bucket node.
- Bucket node - creates the storage bucket and provides its name as an output you map into your container.
- Container nodes - one frontend and one backend, each linked to its own source code.
- Gateway node - the single domain your users hit, routing each path to the right container.
Hit deploy, and it just works.
Skip the setup - use the blueprint
This whole graph is published as a ready-made blueprint: Text Vault - Bucket Demo. Open it, set your gateway domain, and press Deploy - every node, path, and output mapping described below is already wired up.
Prefer to build it yourself, or want to understand what the blueprint does? Follow the steps on this page.
Example source code
The two services used on this page are in the bucket-demo repository. Clone it, upload each folder as its own container source, and follow the steps below.
Example - a text vault
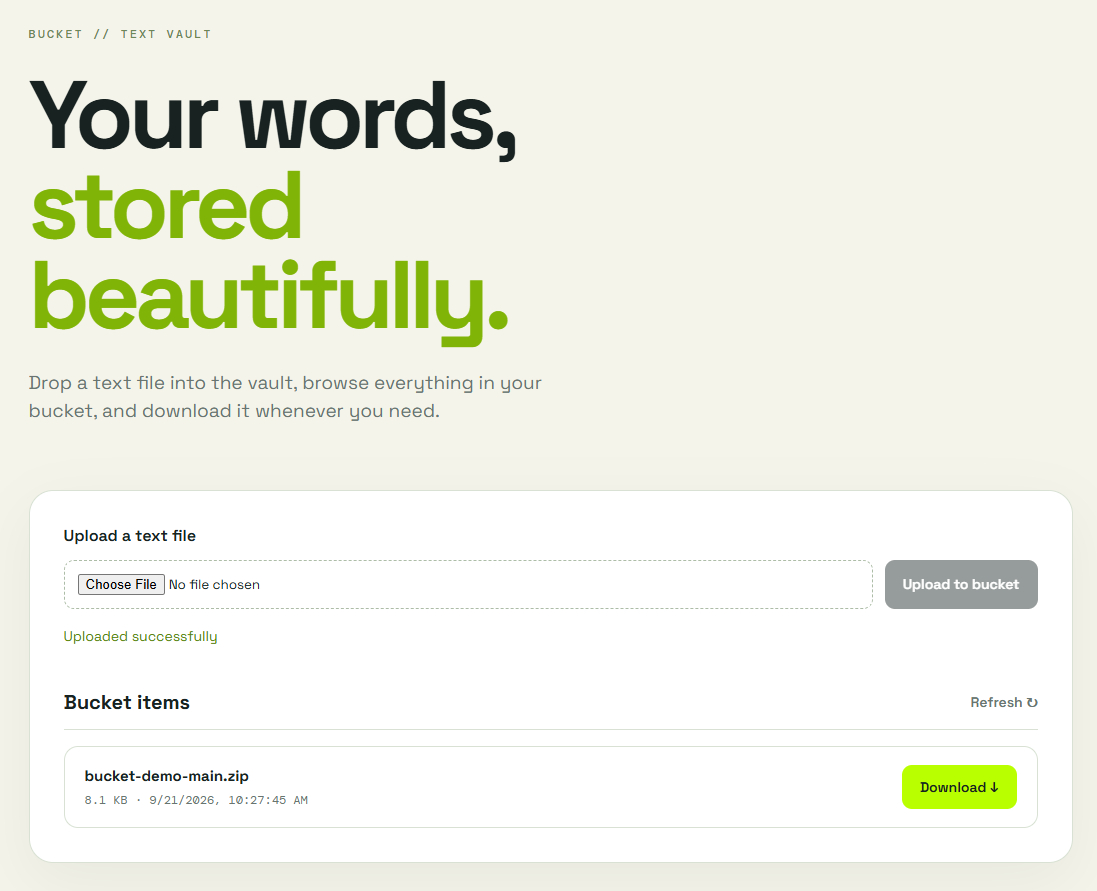
Users drop a text file onto a page, see everything stored in the bucket, and download any file back. The browser never talks to the bucket directly - every request goes through the backend.
| Service | Responsibility | Talks to |
|---|---|---|
frontend |
Next.js page with the upload form and the file list | Nothing - the browser calls the backend through the gateway |
backend |
Go API that reads and writes objects in the bucket | Bucket |
The backend exposes four endpoints:
| Method | Path | Description |
|---|---|---|
GET |
/health |
Returns {"status":"ok"} |
GET |
/items |
Lists every object in the bucket |
POST |
/upload |
Multipart form upload, field name file, max 10 MB |
GET |
/download?name=<file> |
Downloads the named object as an attachment |
Step One - Place the nodes
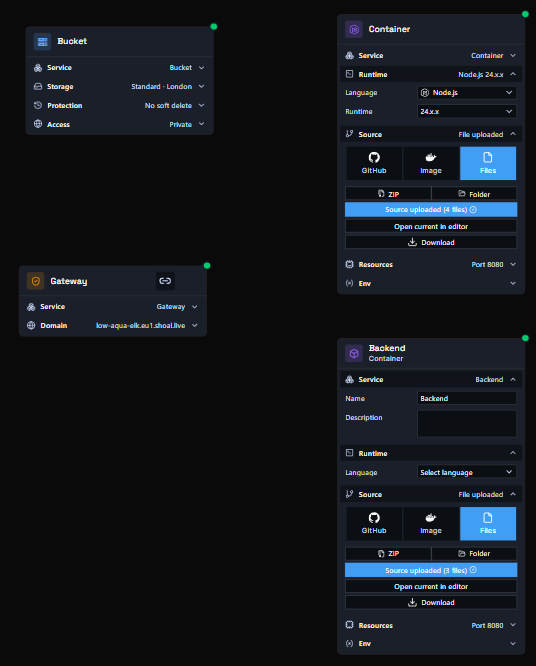
Drag a bucket node, a gateway node, and two container nodes onto the canvas.
The bucket
Click the bucket node to open it and review its settings:
| Setting | What it does | Value used here |
|---|---|---|
| Storage | The storage class and the region the bucket lives in | Standard - London |
| Protection | Whether deleted objects can be recovered for a period after deletion | No soft delete |
| Access | Whether objects can be read publicly or only by your services | Private |
Keep Access set to Private for this example. The backend reads and writes the bucket on behalf of the browser, so nothing needs to be public.
The frontend
Rename the first container node to Frontend. Expand Runtime and set Language to Node.js, then expand Source and upload the frontend folder from the demo repository (or point it at your GitHub repo). Set Port to 8080 under Resources.
The backend
Rename the second container node to Backend. Expand Runtime and set Language to Go, then expand Source and upload the backend folder. Set Port to 8080.
The backend needs a single environment variable - the bucket name - which you map from the bucket node in Step Two rather than typing in by hand.
| Service | Environment variable | Value comes from |
|---|---|---|
backend |
BUCKET_NAME |
Bucket - Bucket Name |
No credentials needed
The demo's README mentions GOOGLE_APPLICATION_CREDENTIALS for running locally. On platform201 you can leave it unset - the backend authenticates to the bucket automatically when deployed.
The gateway
Click the gateway node, expand the Domain section, and enter the URL name you want. For example, entering text-vault will make your app available at text-vault.eu1.platform201.live. You can also point a custom domain at this address.
Step Two - Create the edges
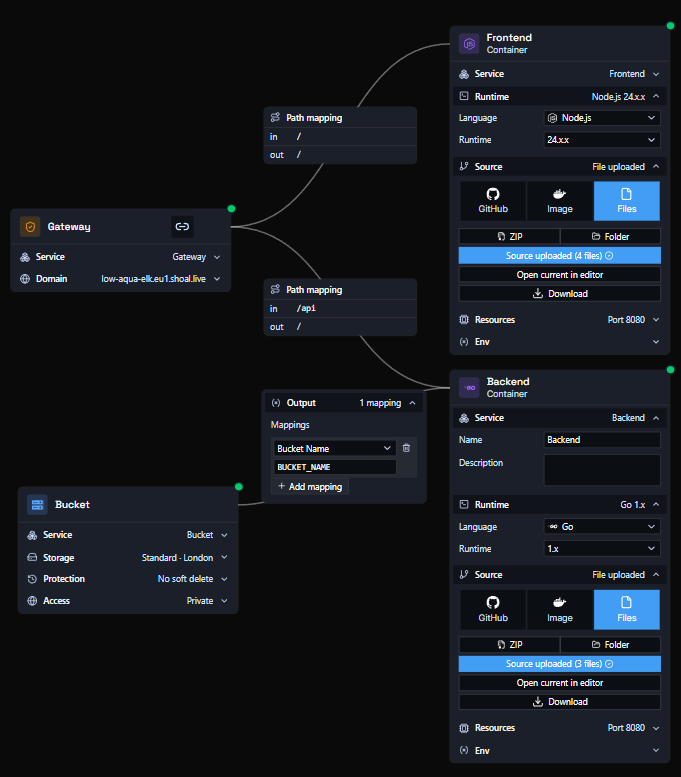
Connect the gateway to the containers with paths
Link both containers to the gateway node, then double-click each connection to set its path mapping.
| Connection | IN | OUT | Result |
|---|---|---|---|
| Gateway -> Frontend | / |
/ |
Catch-all: serves the frontend |
| Gateway -> Backend | /api |
/ |
Browser calls to /api/items, /api/upload and /api/download reach the backend's /items, /upload and /download |
IN is the path your users hit on the gateway; OUT is the path the container actually listens on. More specific paths always win over /, so /api takes priority over the frontend's catch-all. See path-based routing for more detail.
No rewrite config needed
The frontend calls the backend through relative /api/* paths. Running locally, the demo's README suggests a Next.js rewrite to forward them. On platform201 the gateway does that forwarding for you, so the frontend needs no next.config.js.
Connect the bucket to the backend
Link the bucket node to the Backend container. The connection carries an Output panel where you map bucket values onto environment variables. Click Add mapping and add:
| Output | Environment variable |
|---|---|
| Bucket Name | BUCKET_NAME |
Only the backend touches the bucket. The frontend has no connection to it at all.
You can manage environment variables from each container node's Env section, or from the environment settings page. See the environment variables guide for more detail.
Step Three - Deploy
Press Deploy. You can watch the deployment in real time via the Observability menu, or by clicking the link on the deploy button.
Once your graph is working, you can share it with others by pressing Publish Blueprint - which is exactly how the blueprint linked at the top of this page was made.
Done
Open your gateway address. Choose a file and press Upload to bucket - the page shows Uploaded successfully and the file appears under Bucket items. Click Download next to any item to fetch it back from the bucket.
Things to know about the demo
- Files are stored under their original name. Uploading a file with an existing name overwrites it.
- The backend allows requests from any origin (CORS
*). Restrict this before using the code for anything beyond a demo.